The Definitive Guide to the Dune: Awakening Tutorial
Getting Started: Character Creation & The Awakening
The vast, ochre-hued deserts of Arrakis have called to us for generations, a whispered promise of danger, power, and destiny. Funcom’s Dune: Awakening aims to finally let us answer that call, not as a pre-written hero, but as ourselves—a survivor dropped into the most treacherous landscape in the universe. As longtime fans of the franchise and lovers of deep survival games, the anticipation has been immense. Is this the Dune experience we’ve been waiting for? This guide is a codex of that initial experience, a detailed account of the complete tutorial to help you navigate a world that is as beautiful as it is brutal.
Prologue: The Awakening
Before you even create your character, the game sets a dark and intriguing tone. You are a prisoner aboard a transport vessel. The Reverend Mother of the Bene Gesserit explains your purpose: find the Fremen, “Wake the Sleeper.” The scene is intense, culminating with her holding a crysknife to your throat, a stark reminder that your life is not your own. Your journey begins not as a hero, but as a pawn.
The Character Customization Suite
The character customization suite in Dune: Awakening is immense and impressive, allowing you to tweak everything from the broad strokes of your physique to the most minute details of your facial structure. We spent a good while here, knowing that these choices are, for now, permanent. It’s a double-edged crysknife: while the level of detail is fantastic, the inability to alter your appearance later feels like a restrictive choice.
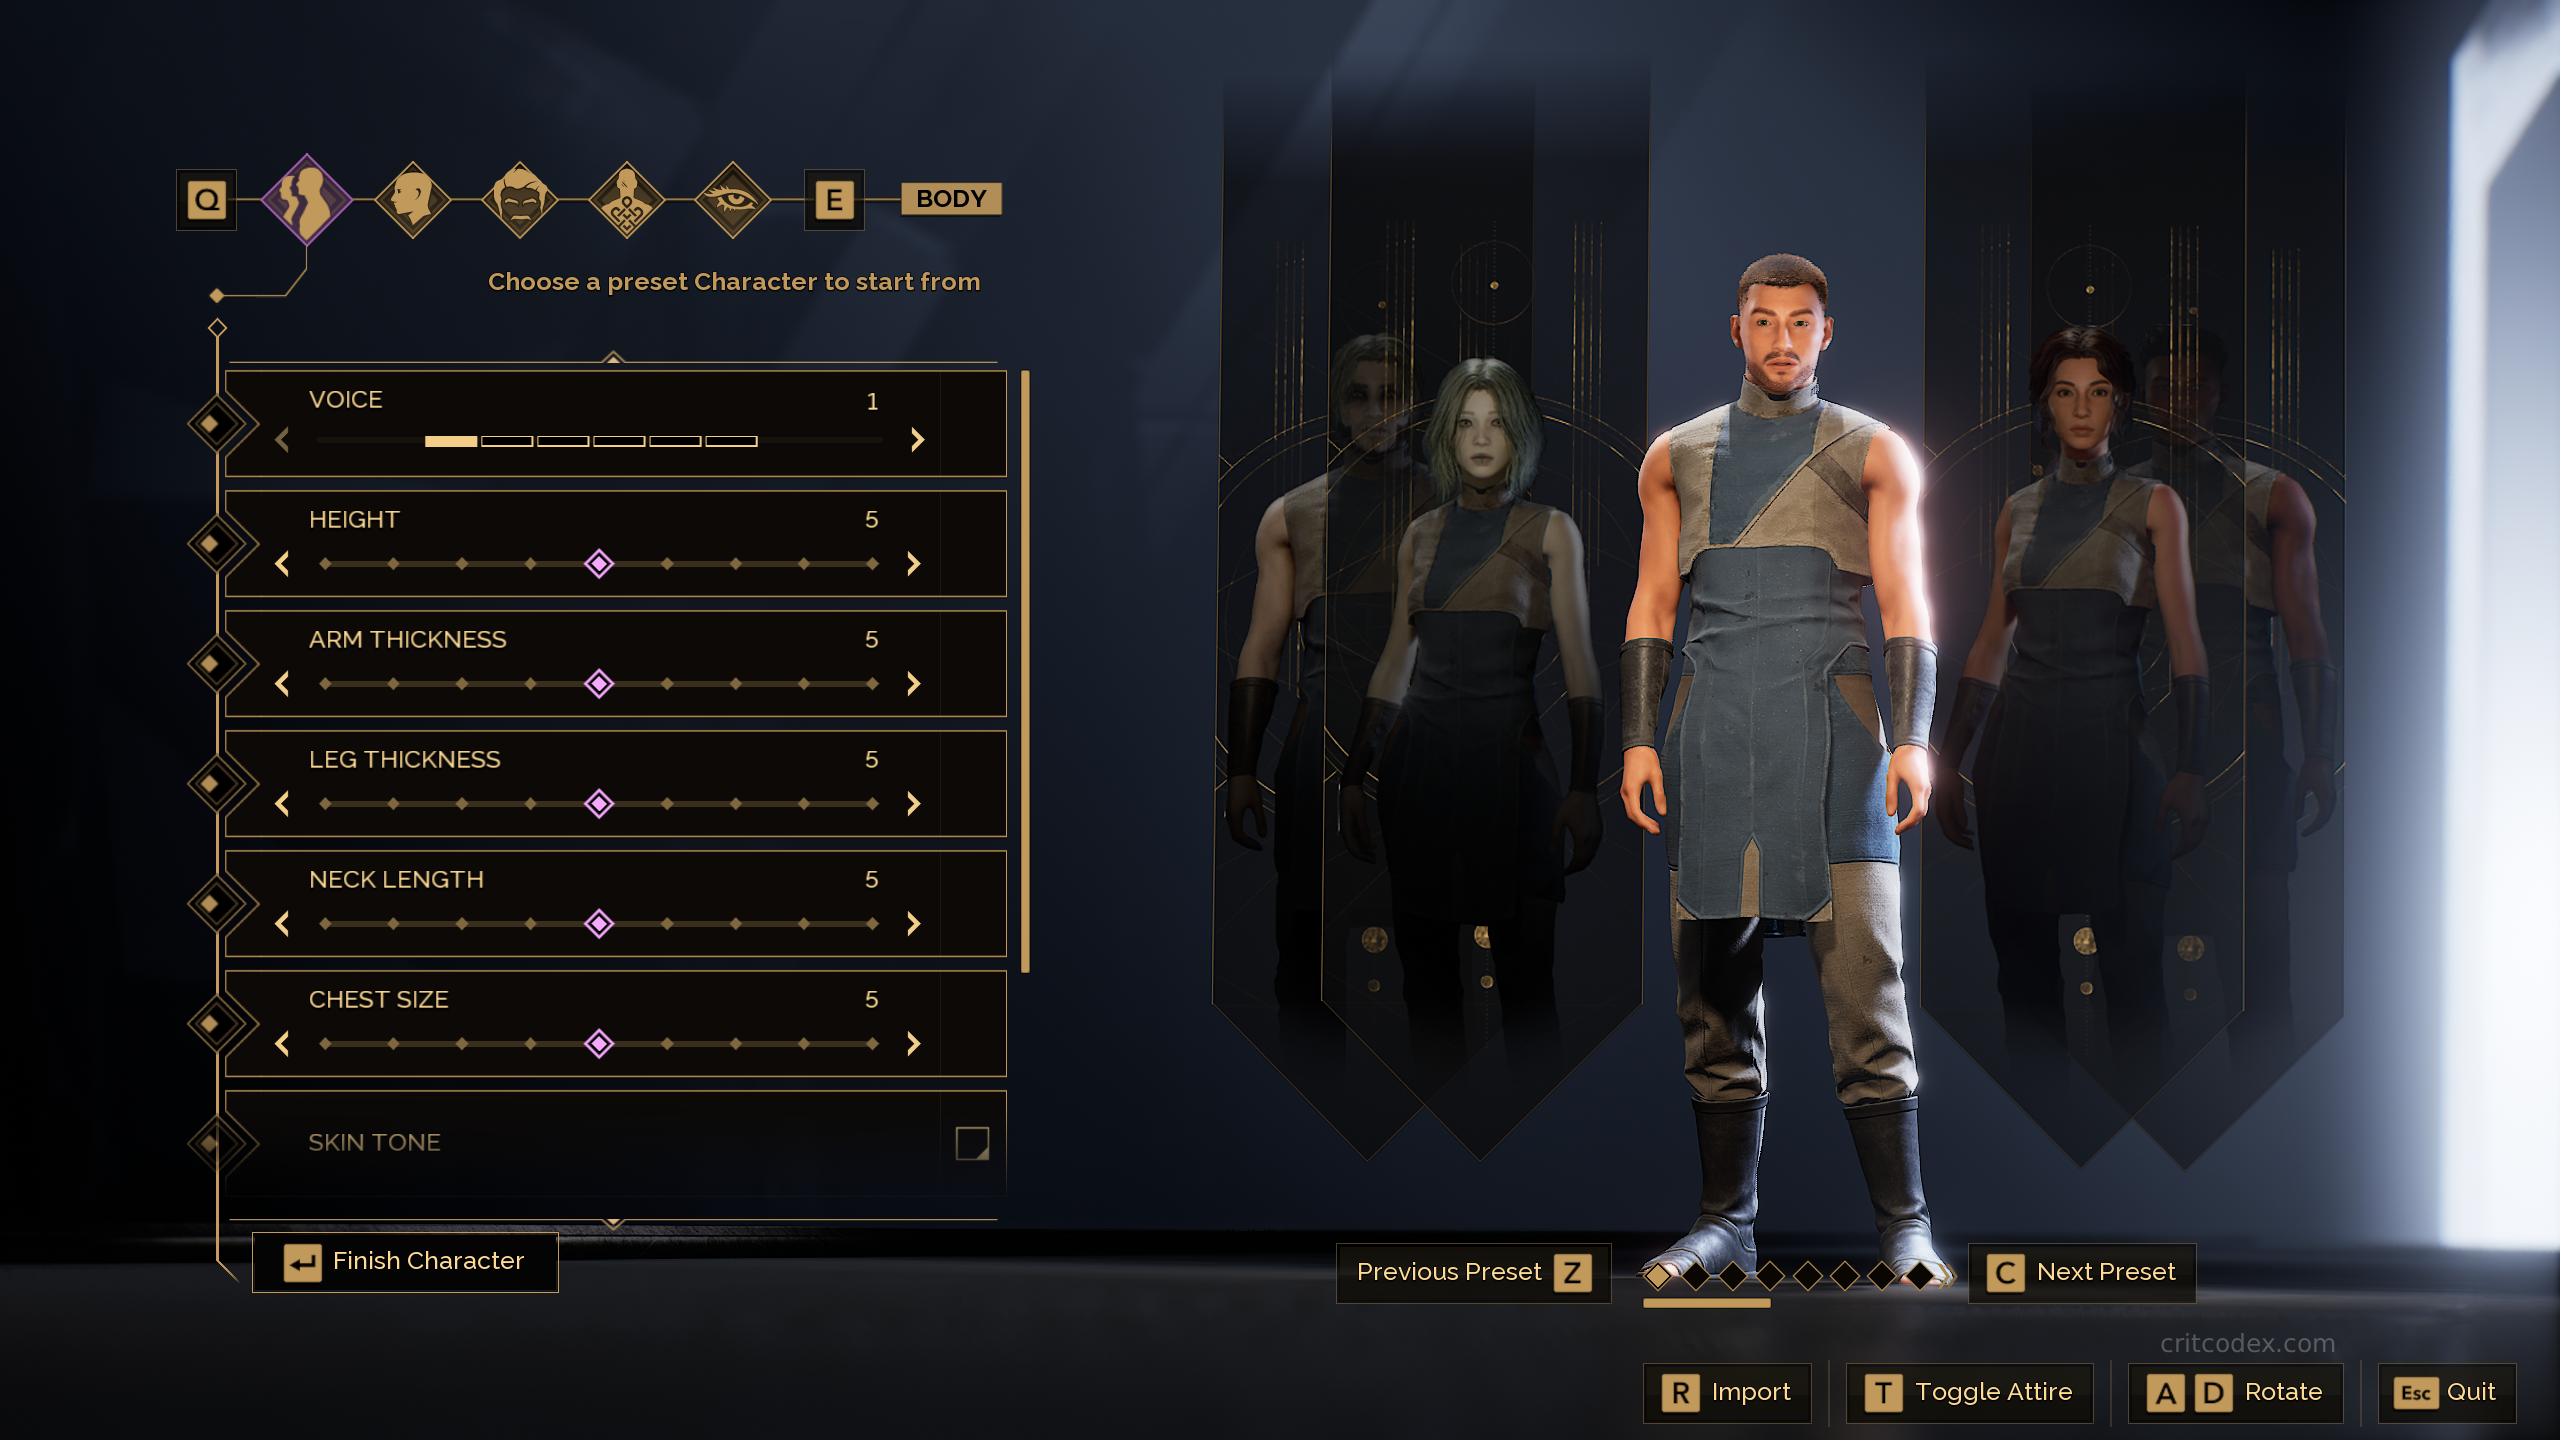
- Codex Insight: We strongly advise creating a temporary character to test their look in the actual game world before committing, as your creation can look very different under the Arrakeen sun.
Server Selection: Worlds vs. Sietches
After finalizing your look, you face the server list. The game presents “Worlds” (primary servers) and “Sietches” (sub-servers). Your single character is saved to a World, but you can move between the different Sietch instances within it.
- Codex Insight: For the smoothest gameplay experience, sort the World list by ping and choose the server with the lowest latency.
Choosing Your Origin Story
Your final pre-game choices are foundational: answering three questions: where you were born, what your place is, and who was your mentor. For our playthrough, we chose Ix as our Homeworld, Pyon for our Caste, and the Bene Gesserit Acolyte as our Mentor.
Your Homeworld and Caste are primarily for role-playing, granting unique dialogue traits and emotes but no passive gameplay bonuses.
Mentor
Your Mentor is your most strategically important choice, as it defines your starting class. While all skills can eventually be learned from trainers, your starting Mentor gives you an immediate and distinct playstyle advantage.
- Swordmaster: The ideal choice for an aggressive, in-your-face melee playstyle.
- Bene Gesserit: A unique choice focused on manipulation and debuffs, using “The Voice” to control enemies in combat.
- Mentat: A tactical, area-control specialist who uses gadgets like the Sentinel dart projector to gain a strategic advantage.
- Trooper: A mobility and demolition-focused class, excelling with the use of the Shigawire Claw to quickly traverse the environment.
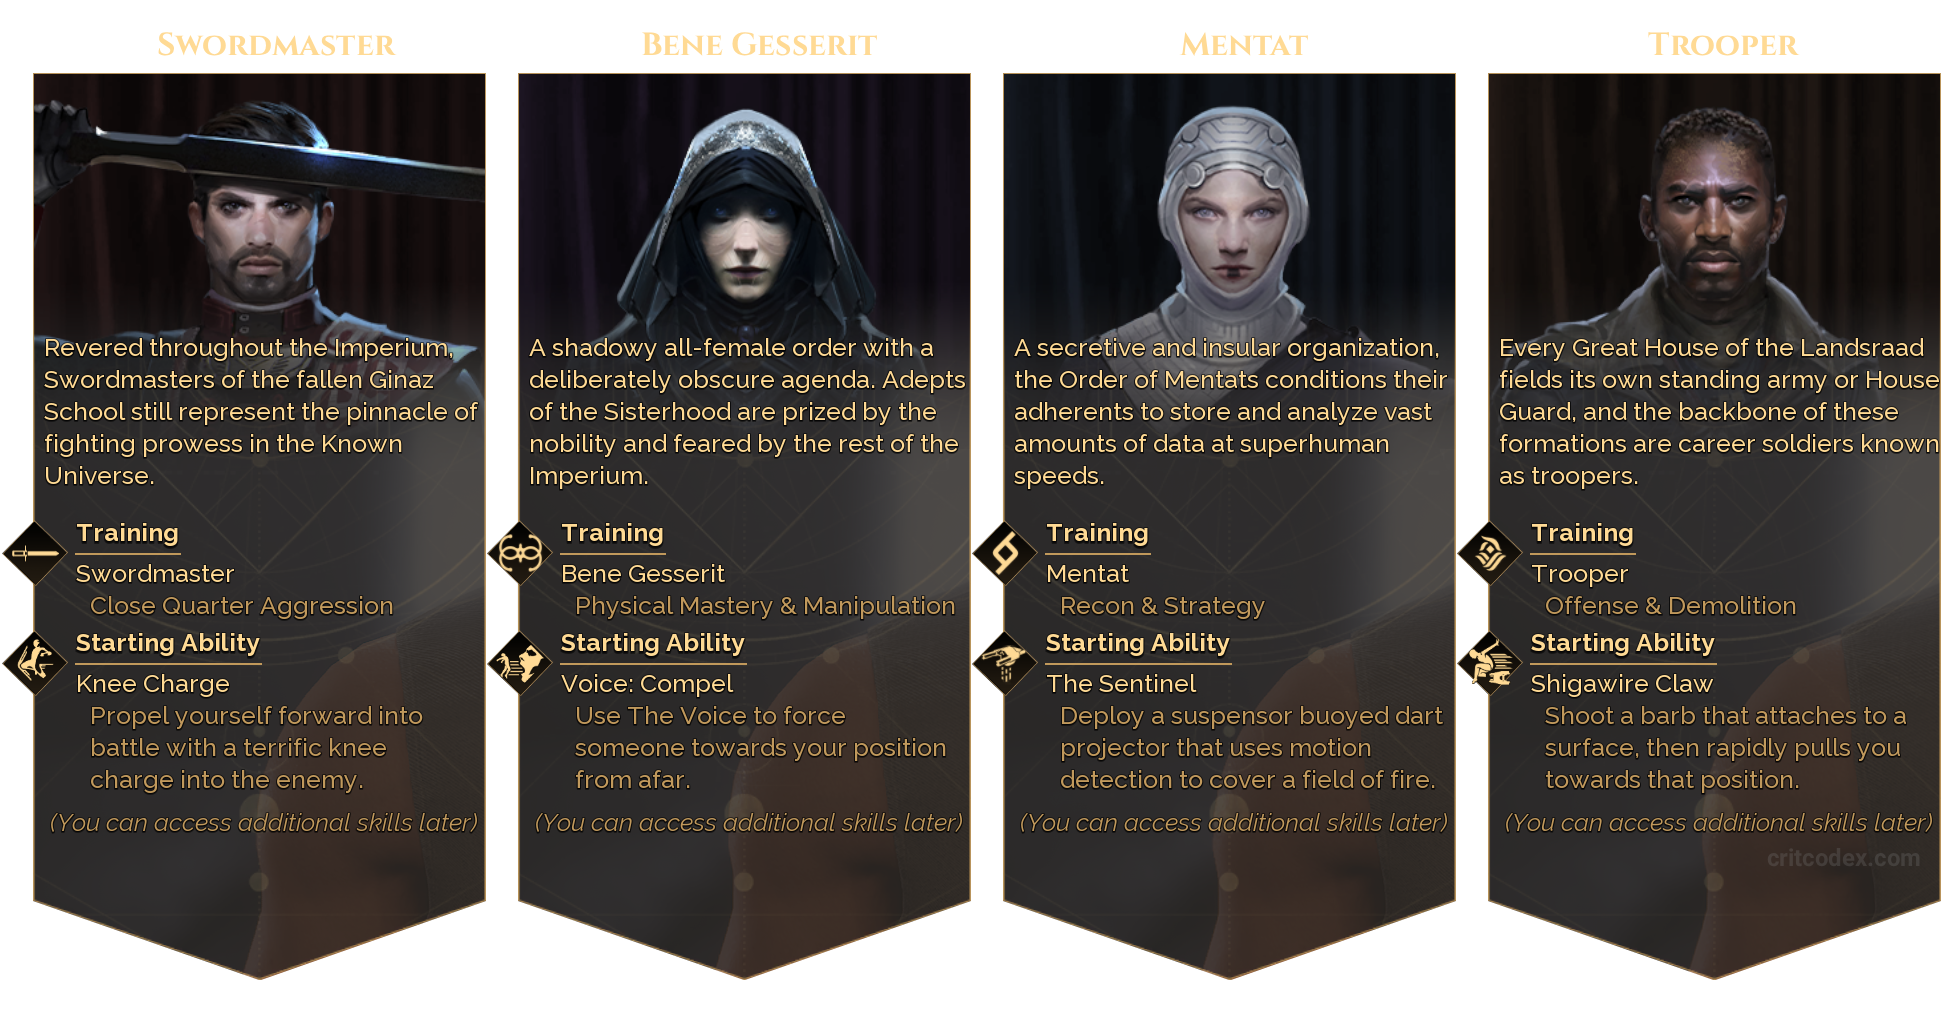
Codex Insight: For a strong early-game advantage, community consensus is divided on the best path. Many players favor starting as a Mentat for its Sentinel turret, which provides significant tactical control for clearing early enemy camps. Alternatively, for those who prefer a more direct approach, starting as a Swordmaster for aggressive melee or a Bene Gesserit for a unique manipulation playstyle are also powerful choices.
A Critical Final Choice: The Research Menu
After your origin is set, you are presented with one final, critical choice. Dune: Awakening features a guided journey that locks the Research Menu until certain objectives are completed. For a first playthrough, we strongly recommend choosing the Locked (Recommended) option to follow this intended path. As the game itself notes, unlocking the menu is an “Advanced” option best saved for subsequent characters who wish to bypass the guided progression.
Waking Up: The First Survival Lessons
After a jarring introduction to the dangers of Arrakis, you awaken alone in a dark cave. This controlled environment serves as the game’s core tutorial, teaching you the absolute basics of survival before you face the open desert.
Crafting Your First Tool: The Scrap Metal Knife
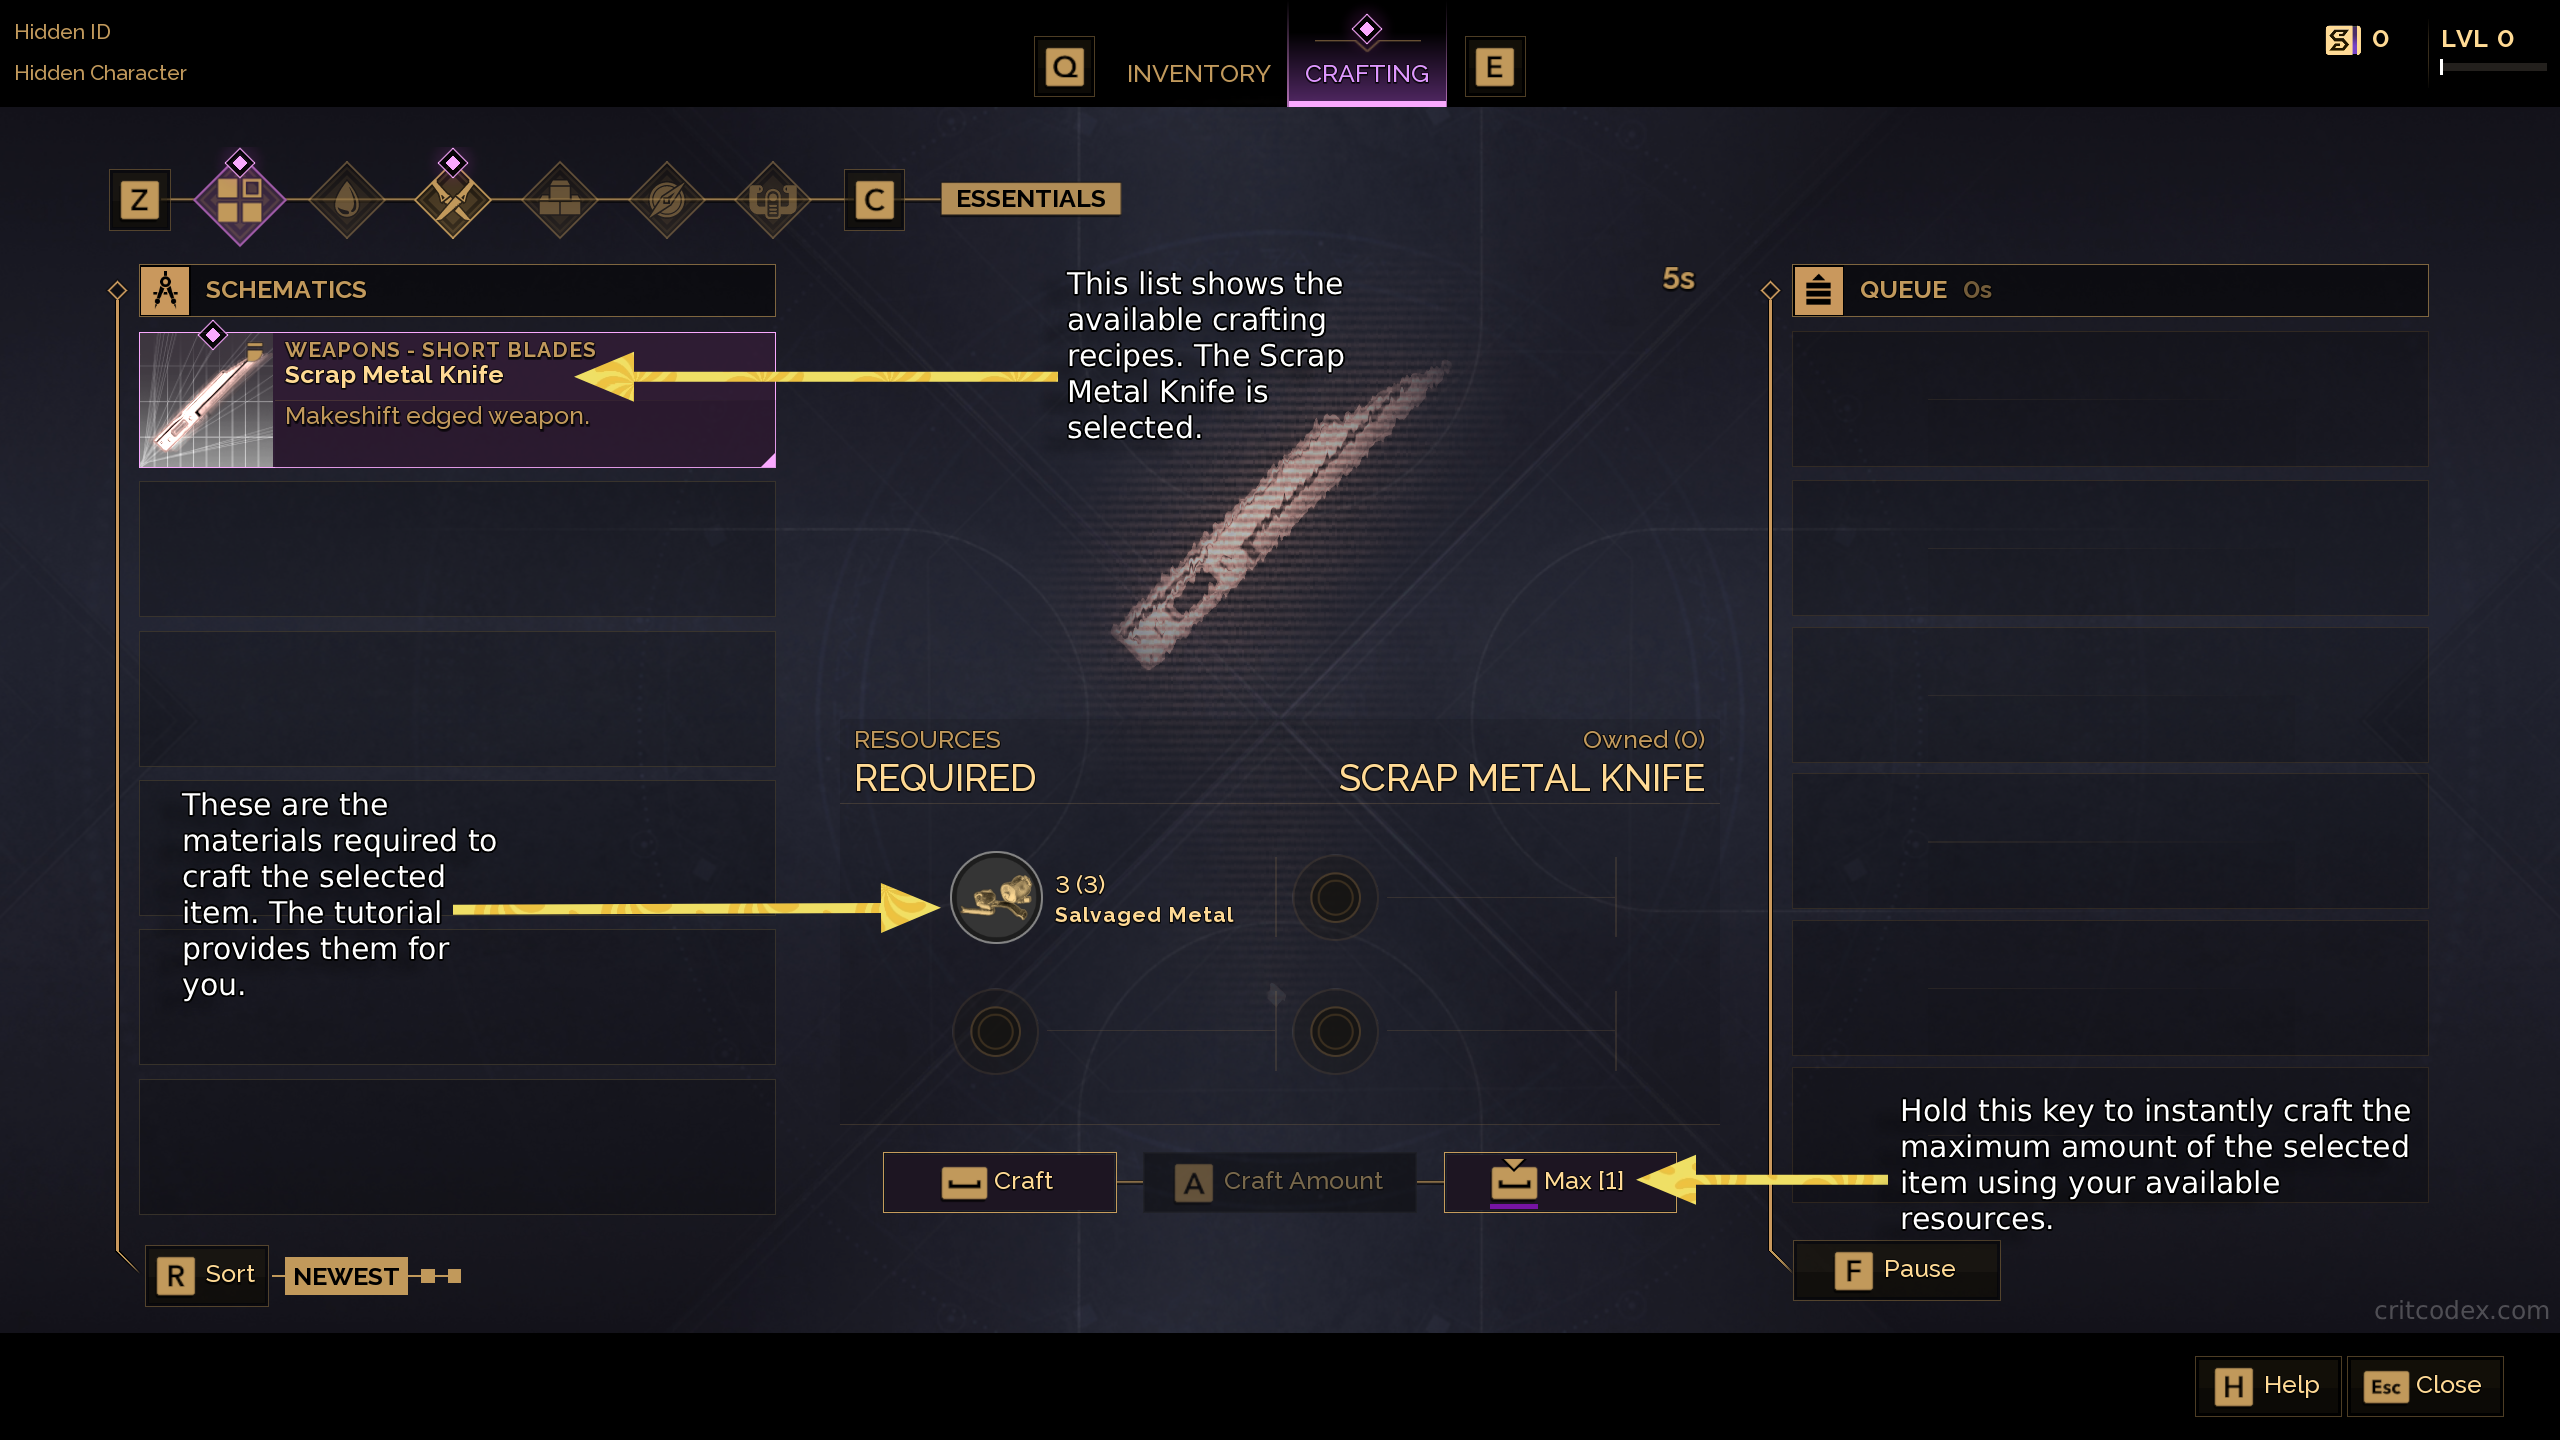
The first thing you will find is a Fremkit on a nearby corpse. Looting it activates your heads-up display (HUD), which includes a compass at the top of the screen and a hotkey bar at the bottom. Your first objective appears: Craft a Scrap Metal Knife. The tutorial ensures you already have the required 3 Salvaged Metal, making this a simple introduction to the crafting menu.
Core Survival: Hydration
Your first and most important lesson on Arrakis is water management. You will find glowing Dew Flowers that replenish your hydration up to one-third of your total meter. Keeping your hydration above certain thresholds provides tiered stamina bonuses, making water management critical to your effectiveness. Be careful, however, as the in-game tooltip warns that consuming too much will cause nausea.
- Codex Insight: A crucial survival mechanic the tutorial doesn’t explain is blood extraction. After defeating an enemy, you can extract their blood and process it into water with a craftable Blood Purifier. This is a vital method for staying hydrated in the early game.
Basic Healing & Traversal
To counter the damage taken from dehydration and other threats, the tutorial prompts you to gather Plant Fiber from nearby bushes. This is the primary component for crafting Healkits, your essential tool for healing wounds.
Finally, the game introduces its straightforward, stamina-based climbing mechanic, allowing you to traverse vertical rock faces to explore new areas or escape danger. Once you have crafted your knife and healkit, you are ready to cut through the membrane at the far end of the cave and face the next part of your journey.
- Codex Insight: Players who chose the Trooper mentor can use the Shigawire Claw ability for enhanced early-game mobility, allowing you to reach high surfaces that are inaccessible with basic climbing. Other tools like the Suspensor Pad also allow access to otherwise unreachable spots for resources or safety, complementing basic climbing.
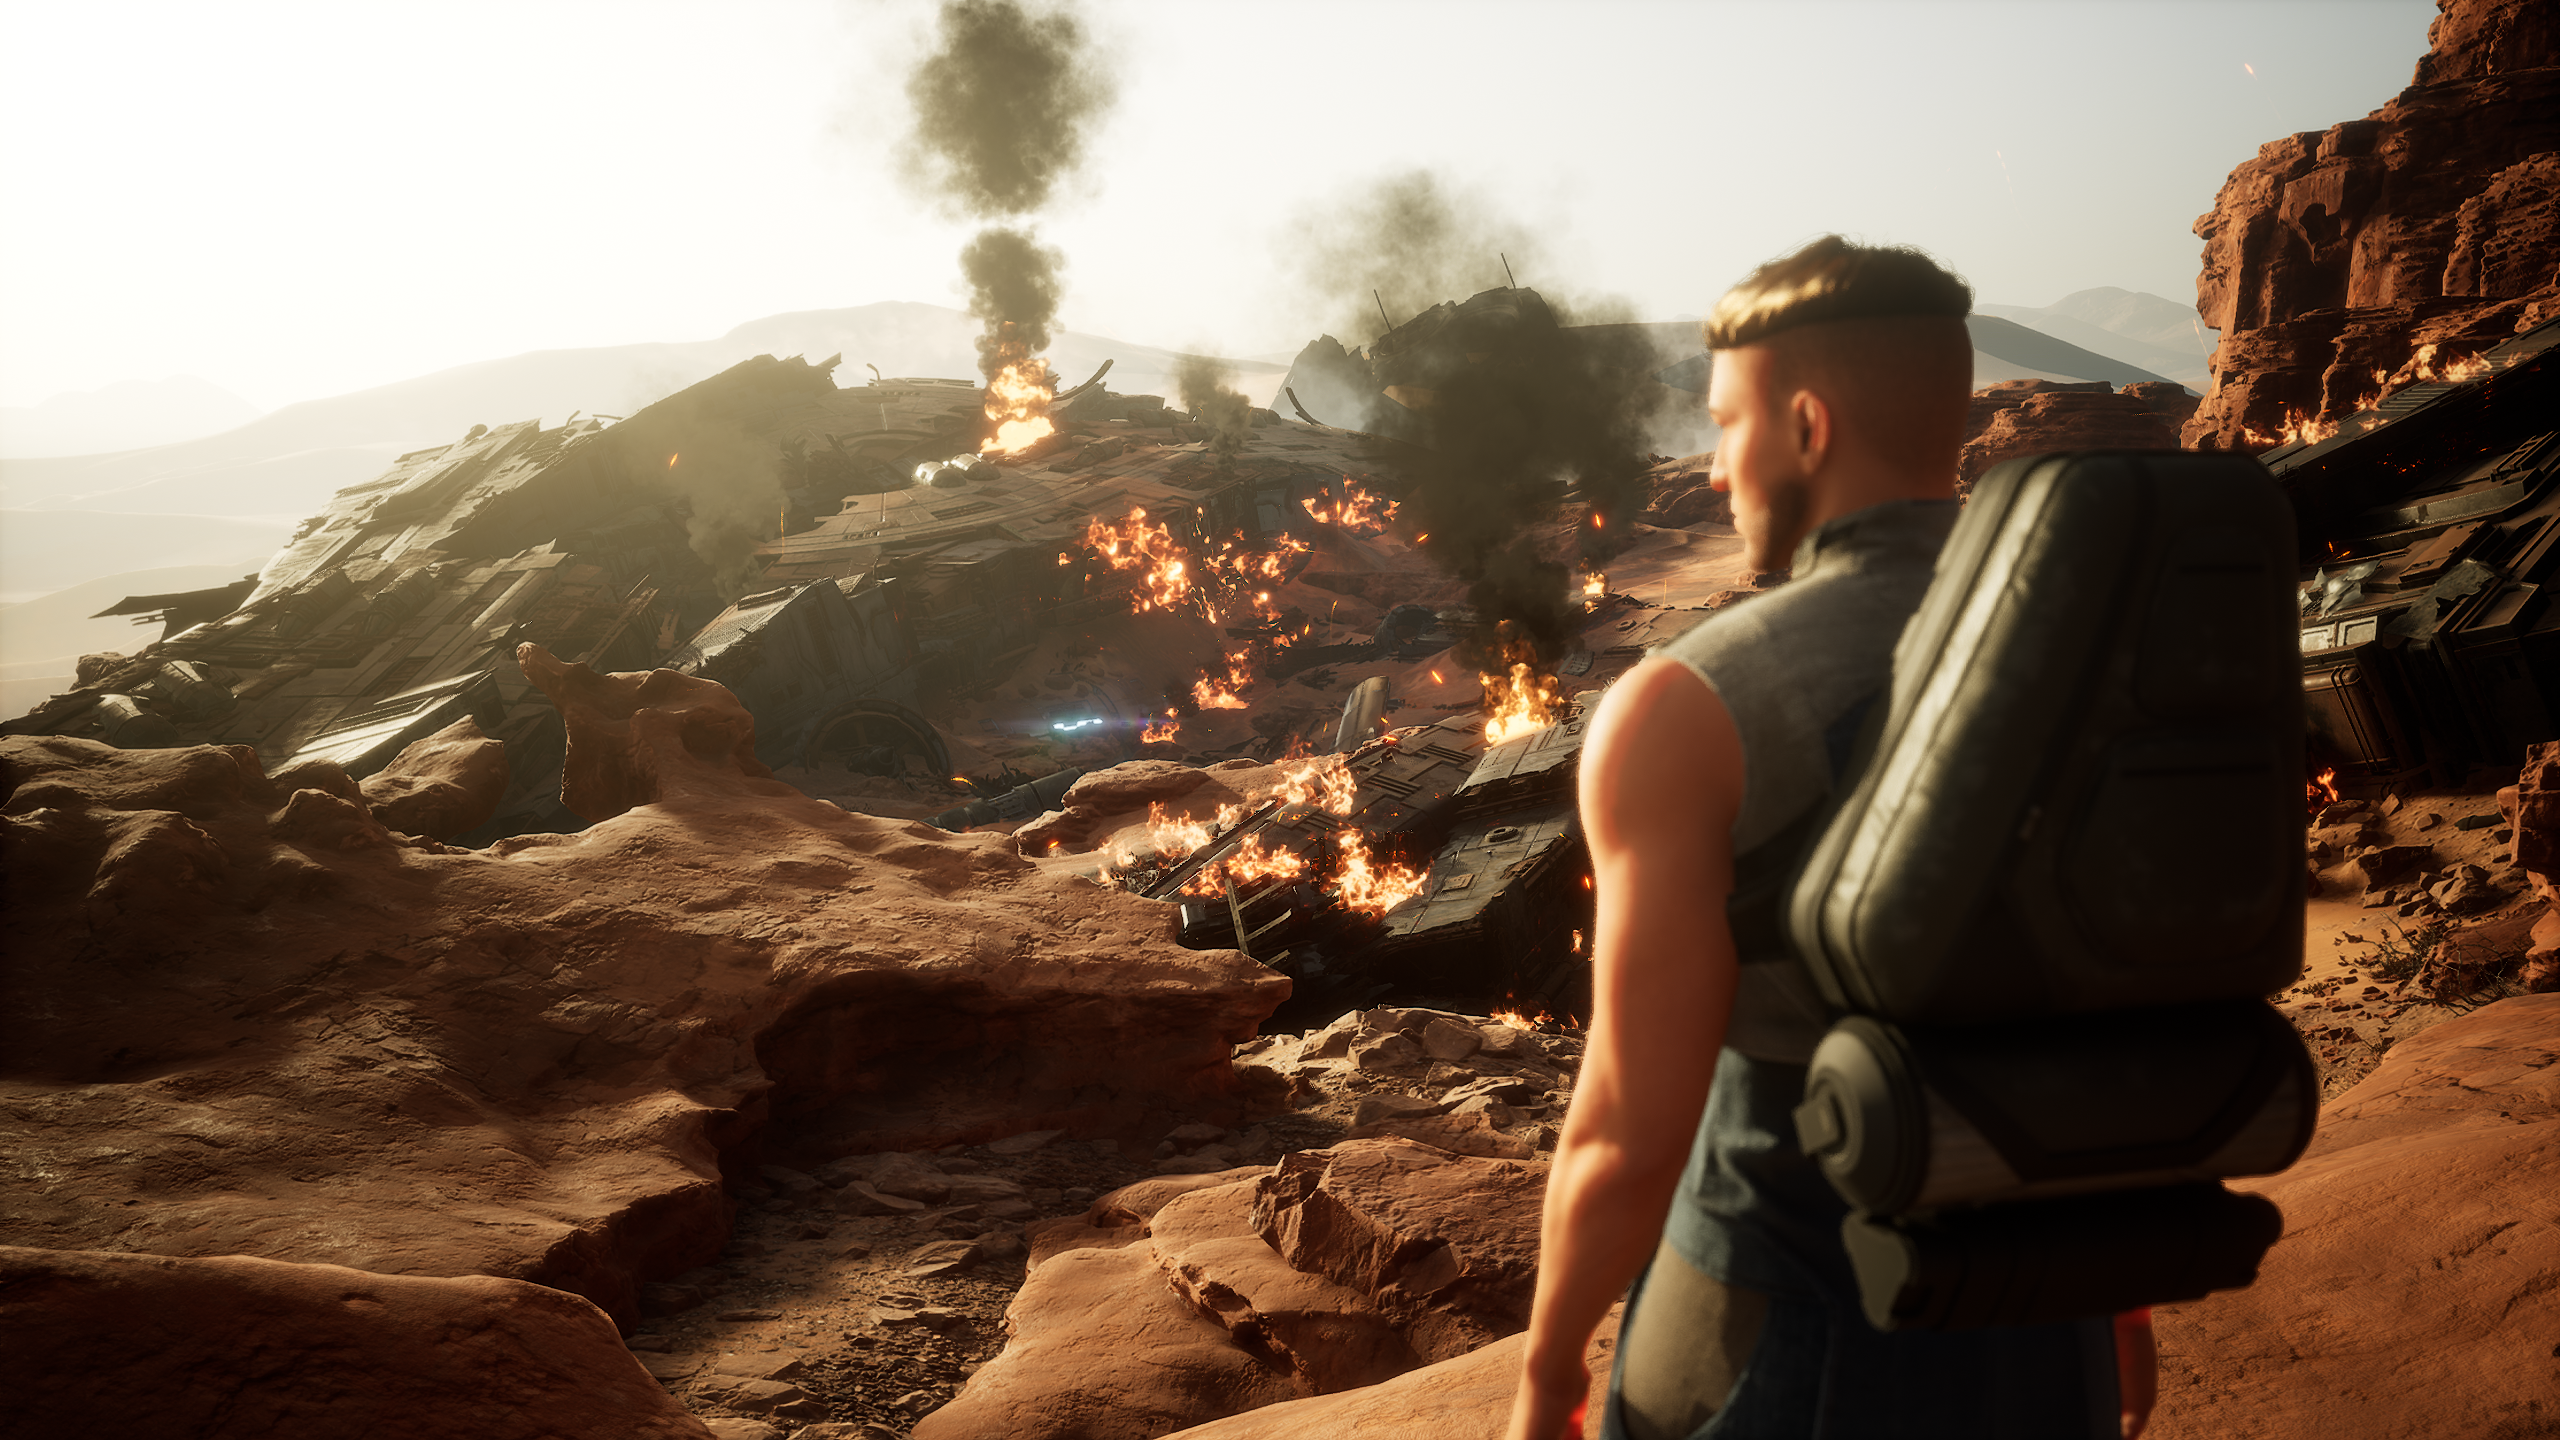
The Crash of the Proteus: Investigation & First Combat
After exiting the cave, you come across a burning shipwreck—your ship, the Proteus. Here you meet Zantara, a gruff outlaw who explains he rescued you from the wreckage and sealed the cave while you recovered. He tasks you with finding a working ornithopter, and to do that, you must venture back into the still-dangerous crash site to retrieve the captain’s command module.
First Contact: Meeting Zantara
Zantara guides you via communicator, establishing the immediate plot. You learn that you are no longer bound for the slave pits of Neo Carthag; you are now free to pursue a new destiny on Arrakis, but you owe him your life. As you head towards the wreckage of the Proteus, his first and most urgent warning is about the deadly Arrakeen sun. A Sunstroke tooltip appears, explaining that spending time in the sun fills a bar that increases your dehydration rate; to survive, you must stick to the shadows.
Exploring the Wreckage
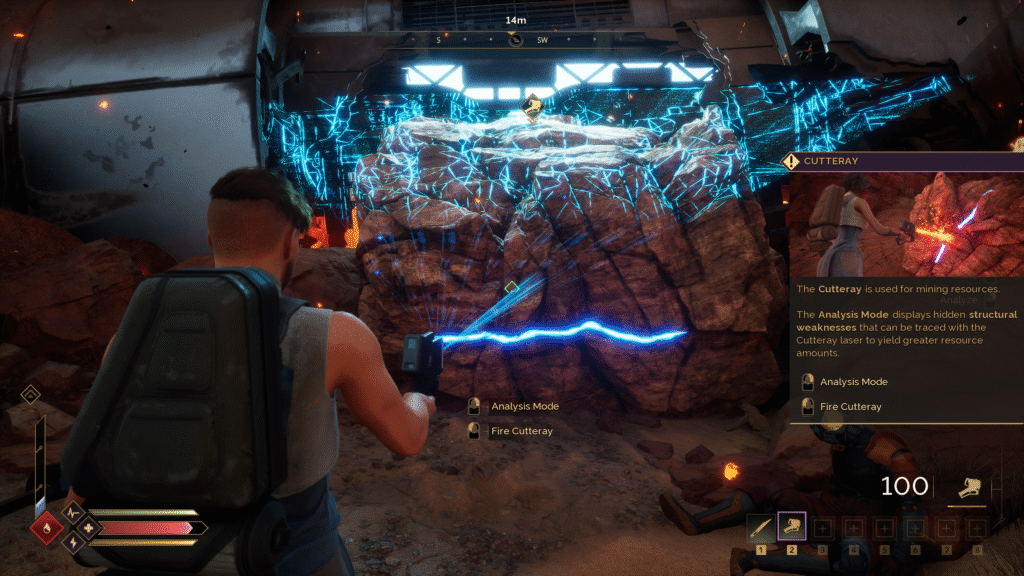
The atmosphere around the fiery crash site is palpable, with the ambient sound design of groaning metal and distant wind creating a sense of immediate danger. Before you can enter the ship, you must search a corpse lying outside the wreckage to find and equip an Improvised Cutteray and a Power Pack. Zantara explains via communicator that this is primarily a mining tool, but its ability to “cut open ships is a useful added benefit.” Using the Cutteray’s “Analysis Mode” (hold right-click) reveals hidden structural weaknesses in the rock blocking the entrance, allowing you to fire the laser and cut your way inside. Once inside, you will notice several paths are blocked by locked Pentashield Barriers, funneling you down a single corridor of combat encounters.
First Combat: Learning the Ropes
Breaching a secondary door with the Cutteray leads to your first combat encounter. The tutorial introduces new mechanics with each enemy, following a specific sequence:
- Light Attacks: Your first enemy is a simple introduction to quick melee strikes that can stagger a target after multiple hits.
- Parrying: The next foe teaches you to parry by timing your block with an enemy’s attack. A successful parry will stagger the attacker, creating an opening.
- Stagger & Dashing: You must then navigate a room with live electrical wires that will stagger you. A tooltip explains that you must dash to break out of a staggered state.
- Water Discipline: After the hazard, you will find a brief respite in a room with water stations. This is where the game teaches a crucial mechanic called “Water Discipline.” As the tooltip explains, having your hydration level above one-third will give you a bonus to your maximum stamina, which is further increased when it’s above two-thirds. When your hydration drops below one-third, the bonus is removed, and when it’s empty, you become dehydrated and will start to lose health until you can hydrate again.
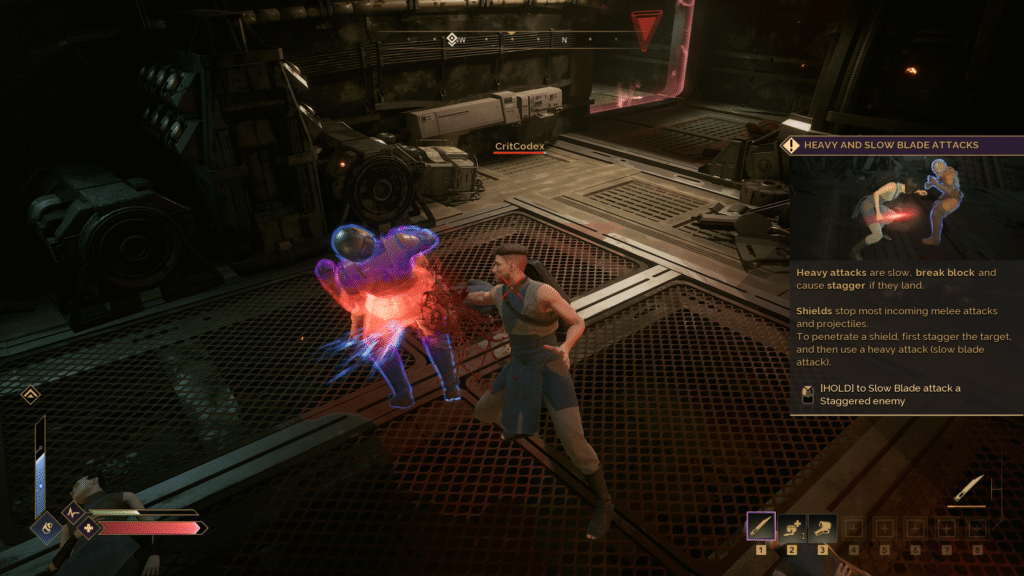
- Heavy and Slow Blade Attacks: Your final combat trial is against a shielded enemy. The tooltip here explains that heavy attacks are slow and can break an enemy’s block. To defeat this foe, you must first stagger them with a parry and then use a “Slow Blade Attack” to penetrate their shield and deal damage.
After the final fight, you will find the Wristband Key which deactivates these last barriers, opening the path directly to the captain on the ship’s bridge.
Escape and Crash: The End of the Beginning
After passing through the final Pentashield, you reach the captain’s corpse and activate the command module’s transmitter. The signal calls in three hostile ornithopters. In a cinematic sequence, Zantara appears at your side, swiftly destroying two of the pursuing ships with a rocket launcher. After the enemy leader, Bator Dakkar, calls him “Outlaw scum!”, Zantara dispatches him and rushes you aboard the final, surviving ornithopter. The escape is short-lived; with more enemies in pursuit, your only option is to fly directly into a massive sandstorm. The screen shakes violently, the ship groans under the strain, and everything fades to black.
A New Beginning: Alone in the Desert
You awaken on foot, alone. Zantara’s voice crackles over the communicator, “I couldn’t wait for you. We need to run now. A sandworm is coming.” The cinematic, guided portion of the tutorial is not over, and the true survival experience begins.
The First Sandworm Encounter
You awaken on foot in the open desert, the wreckage of your ornithopter smoking nearby. Zantara’s voice crackles over the communicator, first with a brusque status update: “Get up offworlder. I couldn’t wait for you.” His tone then shifts to urgent alarm: “But now you need to run. A sandworm is coming.”
Immediately, the ground begins to tremble violently. With no time to think, your only option is to sprint for the safety of a nearby rock overhang. You don’t see the worm, but you don’t have to. This scripted event is a breathtaking moment that perfectly captures the terror and awe of knowing Shai-Hulud is near, delivering on that true Dune feeling.
The “A New Beginning” Journey
Safely sheltered on the rocks, Zantara’s voice returns over the communicator: “You made it offworlder. Catch your breath.” Here, the full User Interface unlocks, granting access to your Map, Inventory, Research, and Skills tabs. The “A New Beginning” journey is introduced, tasking you with your next objective: “Getting Equipped.”

At this time, several tooltips appear to explain the new HUD elements:
- Fade Inactive HUD: Your HUD fades and then hides over time. You can view the Character Status to bring it back by holding or pressing ‘T’.
- Research Menu: This menu contains designs for equipment and shows the location of necessary components. You must use Intel points to acquire these designs.
- Status UI: This UI provides additional information about armor, spice addiction, pinned schematics, and the current zone.
The “Getting Equipped” quest is a multi-step process that requires you to use your new UI tabs in a specific order:
- Gather Resources: The first step is to leave your shelter and gather the required 15 Plant Fiber from nearby bushes.
- Research the Schematic: Open the Research tab and spend Intel Points to unlock the “Schematic Kit: Makeshift Clothing.” This will grant you the recipes for all five armor pieces.
- Craft the Armor: Switch to the Crafting tab, where you will now see the individual schematics for the Makeshift Hood, Jacket, Pants, Gloves, and Shoes. Craft one of each.
- Equip Your New Gear: Finally, open your Inventory tab to equip each piece of armor.
We appreciate that Dune: Awakening isn’t just a sandbox; this focused, narrative-driven path gives your survival actions purpose and keeps the experience engaging.
Understanding Death & Recovery
It’s easy to get lost in these new menus, and Arrakis is unforgiving. During our playthrough, we learned this the hard way by dying of dehydration while crafting. When your health is depleted, you enter a “downed” state where you can be revived with water or choose to “surrender to the desert.”
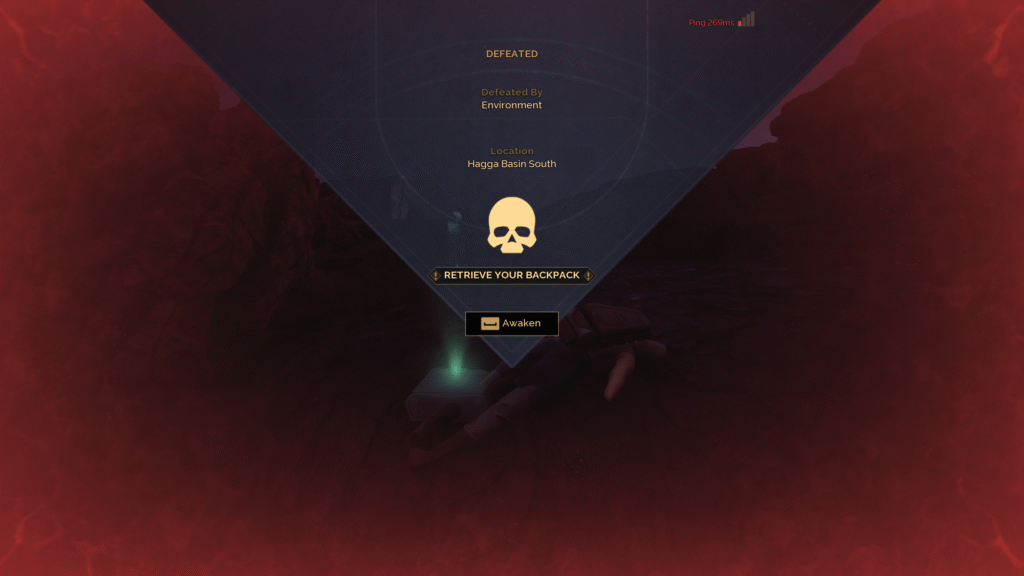
Once you surrender, you are met with the “DEFEATED” screen, which shows what killed you (e.g., “Environment”) and gives you the option to “Awaken” at a nearby respawn point. A “Death” tooltip explains the costly consequences: “Items in your backpack can be recovered from your death location. You will lose everything if you are killed by a Sandworm or Coriolis Storm.” Your equipped gear remains on your person, but you must travel back to your death marker, marked by a skull icon, to retrieve the rest of your loot.
- Codex Insight: The tutorial doesn’t mention this, but you can craft Binoculars early on. After respawning, use them to scout the area around your death marker for threats before rushing in to recover your backpack.
The True End of the Tutorial
After crafting and equipping the full set of Makeshift Clothing, the “Getting Equipped” journey is complete. A new task is immediately presented: get your first ranged weapon by crafting a Maula Pistol. This marks the true end of the initial tutorial sequence.
A Final Lesson: The Sandworm Threat
As you walk back out into the open desert to begin your next quest, a final, crucial tooltip appears, explaining the “Sandworm Threat” mechanic in detail. As the tooltip warns: “This bar in the center of the screen shows the vibrations you are making on open sand – vibrations will attract the Sandworms. When the vibration bar turns red, seek safety immediately – the sandworm is nearby. The closer a worm is, the more sensitive it is to vibrations. Take the utmost care crossing the open desert!”
Early Verdict & Final Tips for New Players
The Verdict: A World of Potential and Peril
Our initial time in Dune: Awakening reveals a game with a powerful, atmospheric core that perfectly captures the oppressive beauty of Arrakis. The foundation of a deep survival MMO is certainly here, and the hints of a compelling narrative driving your actions are a welcome change for the genre. It feels like Dune.
However, the new player experience is highly divisive. While some players and guides praise the tutorial as structured and helpful, a significant portion of the community finds it vague, failing to explain core systems and leaving them feeling lost and directionless. Widespread reports highlight a game struggling with major bugs, shallow PvE, and a toxic PvP environment that can be particularly punishing for solo players. Ultimately, Dune: Awakening has immense potential, but new players should be prepared for a harsh and often frustrating reality.
Beyond the Tutorial: Essential Tips for Your First Day
- Get a Stillsuit: Your first priority after the tutorial should be to craft or find a Stillsuit. It recycles your body’s fluids for water and offers the best defense against heatstroke, a vital upgrade from the Makeshift armor.
- Build Your Sandbike for Free: Don’t wait to craft a vehicle. You can collect free Sandbike parts from various outposts and Imperial Testing Stations to assemble one quickly, dramatically speeding up exploration.
- Master Mobility & Secure Your Base: Invest in tools like a Suspensor Pad for vertical traversal. This can help you access hard-to-reach resources and reclaim your starter zone base to protect it from sandworm attacks.
Purchasing Dune: Awakening
Currently, Dune: Awakening can be purchased directly on Steam. We will update this guide with affiliate links from other retailers as they become available.